Saturday, September 12, 2009

Bacon and Egg Pies

Fast, Easy, Cheap and Tasty.
Took a day off yesterday, played and sewed and just generally lost track of time, imagine the shock of hearing the garage door open when I was sure it was only 3 o'clock..........and what was to be had for dinner?!?!.
Thankfully one of the things I had done was cruise through a Donna Hay cookbook, yep, another one, this time her modern classics book 1, where there was a rather interesting and easy looking recipe for bacon and egg pies on page 158.

Using frozen pastry, grated cheese mixed with mustard and of course bacon and eggs this was very quickly assembled and popped into the oven for 15 minutes while I scooted downstairs and harvested the lettuce leaves, spring onion and basil for the salad.
Popped them onto plates and topped them off with some of these goodies, Kumato grape tomatoes, darker skinned with a hint of black, they are a sweet and flavourful tiny tomato, not exactly budget but hey, a few go a long way and the same goes for Sardinian green olives and Persian Fetta.

Friday, September 11, 2009

Old fashioned and a budget beater, but tasty

Gosh, its been ages since I cooked some of these more old fashioned meals, first there was the meatloaf, then the leftover fritters and now for heavens sake Rissoles, not only rissoles, but gravy, dried peas and plain mashed potatoes.

The Darling does like dried peas, his Mum used to cook them, I have a tendency to burn the poor little blighters, in fact we lost a perfectly good coffee table after one effort.
The only concession to anything a little more up to date food wise is the caramelised sweet balsamic onions on top and no there isn't a recipe, just slice up as many red onions as you think you will need and then slice up a bit more.
Cook them slowly in a heavy based fry pan with a little olive oil and just a tad of butter until they are nicely caramelised, add a good splash of balsamic vinegar and let sit over a low heat for a few minutes. Rather yum if do say so myself.
Ohh and the coffee table? well the family was home for dinner and there was a tad of wine involved, so judgement was a little skewed, .......you understand.
So after filling the kitchen with burnt pea smoke, I removed gently, well o.k., chucked, the saucepan into the sink and filled the pan with water,
Mistake!
Big mistake!
The steam smelled worse than the smoke, so I slapped a lid on the pot and just left it to moulder.
Someone helpful came alone, smelled the burnt pea smell, and immediately knowing what I had done - past experience you know - and to be really helpful removed the saucepan to the back deck, where the only place to put the pan down was the coffee table, oh and did I mention that the top of the table was glass??
Someone helpful was barely back in the kitchen when there was this rather explosive bang, followed by the tinkling sound of glass raining down from the verandah to the concrete below.
DDIL was not happy, it was her Coffee Table.

Wednesday, September 9, 2009

Leftovers, what do you do with them?

We had meatloaf for dinner the night before last, its literally been years since I made a meatloaf, but the request had been made and as I'm on a bit of a budget kick the two tied in together. However, we had leftovers, even after sending a roast vegie and meatloaf lunch off with the Darling, we had leftovers, so what with the budget kick and my hating to waste food, something had to be done.
A quick net search and about the only thing that came up was either fritters or bung it in a can of soup and call it a.............well I've forgotten what it was called and it is probably a fine thing to do but just didn't seem to be up my alley, so I went with the fritter idea, there was a nice sounding potato fritter, not unlike roesti so I went with that. The only thing I would change is the size of the meatloaf chunks, as the potato cooked down the chunks became more of an accessory than an integral part of the fritter. The whole thing was surprisingly tasty and very easy, I topped the fritters with a fresh tomato and caramelised onion sauce and a sno pea salad.

Fritters for 3 serves
4 medium potatoes, grated and squeezed dry
1 medium onion, grated
1 egg
1 Tablespoon plain flour, approx
salt and pepper
leftover meatloaf, cubed, 1 to 1 1/2 cups small chunks
Olive oil
Grate the potatoes, and using you hands, take handfuls of the grated potato, squeeze the excess potato juice out over the sink and place dry grated potato into a large bowl.
Grate the onion, add to the bowl with the potato.
Add egg to the potato and mix together well.
Sprinkle the flour over the potato, just enough to pull the mixture together, Add the meatloaf chunks and season.
Heat a good coating of oil in a heavy based fry pan.
When pan and oil are hot, place 1/4 cup measures of the potato mixture into the pan, press down to flatten slightly.
Cook over low heat until fritters are well browned and crisp on both sides. The center of the fritters will be creamy when fully cooked.
You will need to use two pans if you are cooking a number of fritters or remove the first batch to the oven to keep warm and continue using the one pan.
When fritters are all done, place on serving plates, top with tomato sauce and the sno pea salad and Enjoy!
Caramelised Onion and Fresh Tomato Sauce
1 medium onion, finely sliced
2 large ripe tomatoes, seeded and chopped - I didn't bother peeling the tomatoes, I rather like the skin left on the chunks
1 clove garlic, minced
1 tablespoon olive oil
1 tablespoon stock or water.
Heat oil in saucepan and add onions, fry over a medium heat until the onions caramelise, turning a nice soft brown, don't allow the onions to catch and burn, they will go bitter.
Add the tomato chunks and stir through. Place lid on pan and allow to cook down, stirring occasionally.
Add a little stock or water if the sauce is becoming too thick or beginning to stick to the pan.
Sno Pea Salad for 3
150 - 200 grams sno peas,
1/4 red capsicum
1/4 green or yellow capsicum
1/3 long red chilli - more if you love chilli
1 tablespoon light soy sauce
1 tablespoon brown sugar
3/4 tablespoon lemon juice
Blanch the sno peas in boiling water for 1 min, drain and refresh under cold water.
Drain well and place in bowl
Very finely dice the red chilli, place in screw top jar with soy sauce, brown sugar and lemon juice, shake well and allow to sit for a few minutes.
Slice capsicums finely, add to sno peas and pour dressing over to serve.

Thursday, September 3, 2009

Oven Semi-Dried Strawberries

That wonderful flavour of fresh picked strawberries is pretty hard to beat with its promise of spring days and fresh produce. When the opportunity presents I like to semi dry the berries in the oven to use them in cakes and salads. 
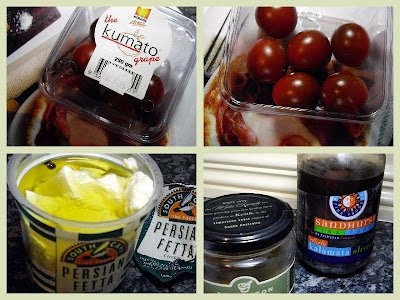
It is a simple process, and the net abounds with different methods and how to's but I just simply wash them, slice away the top and halve them, placing them onto a paper covered biscuit tray.
If I am planning on using them for cakes etc., I sprinkle just a little brown sugar over them and put them into a slow oven 130 degrees Celsius, for about 50 - 60 minutes.
If the plan is to use them in a Spinach and Strawberry salad, just pop them into a bowl, sprinkle a little brown sugar over with a splash of balsamic vinegar, turn them to coat and pop them out onto a baking paper lined tray and into the oven for the same time and temperature.
When sliced open, the halves are still full of moisture, the flavour is intensified and the dry surface helps them not to sink to the bottom of the cake mix.
They will keep for awhile in a jar in the fridge, how long I'm not sure as I use them pretty quickly, these will be made into muffins tomorrow.

Wednesday, August 26, 2009

Cumquats and Limes

Harvested the Cumquats and a few limes from our trees, and decided to have a go at preserving one of the limes.
No jar with a wide enough neck to take a whole lime so I quartered it and packed it with salt, then,following the advice on preserving lemons in Stephanie Alexanders book, I topped the jar with added lime juice. This is going to be a resounding success, and I will be serving lovely preserved limes with my Tagines. Or it will be a disaster and no one will ever hear about that poor little lime again.
An experiment in making Cumquat Syrup, these quarters will sit in the sugar and brandy for a day and then be popped into a pan of heavy syrup, simmered for a few minutes and be ready for use immediately to drizzle over a citrus cake.
Recipe for Cumquat Syrup
Weigh cumquats and measure out equal weight in sugar.
quarter cumquats, removing all seeds and mix with 1/3rd of the sugar, place in a jar to with a good slosh of brandy, about 1 - 2 Tablespoons. Cover and let stand for a day.
Place the 2/3 rd measure of sugar into a sauce pan (not aluminium) and with a very little water,
melt the sugar and bring to a simmer, add the cumquat quarters and syrup and simmer for approx 10 mins.
This will be the first time I have tried that old favourite, Brandied Cumquats, but I have enjoyed them in the past, it will be interesting to see if they are as good as I remember.

Friday, August 14, 2009

Pork Cutlet with Apple Slaw

After a day of mending, house cleaning, playing in the cubby with the youngest Grandie and getting over the sticker shock of taking the Shitzu to the vet, I really was looking for something simple for dinner, trouble was, no lunch also meant I wanted something to sink the fangs into.

Went for a straight copy of the Donna Hay 'Peppered Pork with Apple Slaw' from her latest book 'no time to cook' and another of her ideas of herbs in olive oil over slices of steamed potatoes.

What can I tell you, it was fast, it was easy, and beat the nickers off take-away on all fronts.

Peppered Pork with Apple Slaw on page 36, in the chapter aptly named fast flavour, go spoil yourself.

Beef Tagine with Honey, Prunes and Apricots

Another wonderful pressie I was lucky enough to get for my Birthday was a Tagine, now I have hankered over one of these for such a long time, gee, could it be at least a couple of years now??

Anyway, I was given this wonderful tagine, a gorgeous splash of red for my kitchen, and it goes rather well with that other showy splash of gorgeous red in the kitchen, my lovely new Kitchen Aid mixer.......ahh red, the new pink....., sorry, got a bit carried away there....

Today I found a recipe for a beef tagine, whew, the list of spices almost took my breath away, but they were all in the spice drawer so just got to work and assembled the most glorious flavour sensation.

While the tagine was cooking the kitchen smelt like you could just package it up with a ribbon and be happy forever, wonderful aromas.
As couscous isn't a fave in this neck of the woods, we decided on rice as the accompaniment.

There will be more tagines in our lives.

The recipe I loosely based our tagine on was 'Fragrant Moroccan Beef, Date, Honey and Prune Tagine' from Recipe Zaar. The recipe called for ras el hanout spice mix or their substitution, well on a whim I Googled 'ras el hanout', and while Recipe Zarr called for 4 spices this little lovely called for no fewer than 12, well.........ya gotta give that a go now don't you!


So here is the list of ingredients I used.
For the Ras el Hanout spice mix
1 teaspoon ground cumin
1 teaspoon ground ginger
1 teaspoon ground turmeric
1 teaspoon salt
3/4 teaspoon ground cinnamon
3/4 teaspoon ground black pepper
1/2 teaspoon ground white pepper
1/2 teaspoon ground coriander seed
1/2 teaspoon cayenne pepper
1/2 teaspoon ground allspice
1/2 teaspoon grated nutmeg
1/4 teaspoon ground cloves

For the Tagine
500grams cubed beef, - I used round steak
1 tablespoon olive oil
1 large onion, chopped
1 large clove garlic, minced
1 carrot, peeled and cut into chunks
1 400 gram can diced tomatoes
6 pitted prunes
6 dried apricots - the recipe called for dates, but -... well you know the story
1 scant tablespoon honey
1 cup beef stock
2 rounded teaspoons of the ras el hanout spice mix
Assemble the ras el hanout spices, they will keep for a month in an airtight jar.
Heat the tagine base over a medium heat, add the olive oil and when heated add the beef cubes and turn to brown all over.
Add the onion and garlic, followed by the carrot chunks, stirring through the meat to pick up the lovely juices.
Add the spice mix, stirring all the while so that all those lovely spices coat everything and don't catch on the bottom of the tagine.
Pour stock into tagine, stirring again
Add the tomatoes, prunes, apricots and honey, stir well and cover with tagine lid
Lower heat and cook slowly for about 1 - 1 1/2 hours, If the beef was tougher the cooking time would have to be longer
The dish was lovely but the pics were not.
Mmm, yummy

Thursday, August 13, 2009

Parmesan Topped Chicken Patties with Lemon and Potato Wedges

Did a clean out and tidy up of the freezer yesterday morning, and a few things need to be used up, I will not be doing a lot of cooking over the next few weeks so time to move that stuff out of there, and of course the added bonus, saving on the butchers bill.

But what to do with a great lump of Chicken Mince....and why did I buy it anyway??, its not like it's a cheap alternative, oh well o.k., its not as expensive as steak, but it certainly isn't cheap.

With a little thought and a lot of Donna Hay inspiration this is what I came up with, Chicken Patties with a lovey buttery crisp Parmesan topping and baked lemon and potato wedges.

The inspiration for this dish can be found on P. 137 of the new Donna Hay book 'no time to cook', another winner and added to my collection for my birthday.

for 6 patties (or 3 servings) this is what I used

for the Lemony Wedges
3 potatoes, scrubbed and cut into large wedges
1 lemon, quartered
thyme leaves stripped from 2 stalks of thyme
salt and pepper
1 tablespoons olive oil

for the Chicken Patties
350 grams good quality chicken mince
1 small onion, finely minced
1 clove garlic, minced
1 teaspoon finely chopped parsley
1/4 cup fresh breadcrumbs
1/4 cup dried breadcrumbs
salt and pepper
1 teaspoon olive oil
3 - 4 tablespoons dry white wine or chicken stock
1 small clove garlic, roughly crushed with the flat of a knife and skin removed

for the Crunchy Topping
1/2 cup fresh breadcrumbs
1/4 cup finely grated parmesan
30 grams butter, melted
2 stalks of thyme leaves, stripped from stalk and finely chopped
cracked black pepper

This is how I did it
1 hour before mealtime Pre-heat oven to 180 deg Celsius
Cut potatoes and lemon into wedges and place in large bowl.
Pour over the olive oil, turning wedges well with a spoon or spatula to make sure they are completely covered.
Turn into a baking dish
Sprinkle over the thyme leaves, salt and pepper and roast in oven for 45 mins, turning once, until potatoes are soft and starting to brown
While potatoes are roasting, organise the topping and the patties.

In a small bowl, combine the fresh breadcrumbs, parmesan, thyme leaves, salt and pepper.
Place the 30 grams butter in a small saucepan and melt over low heat, turn off heat and leave to cool a little
Place chicken mince with the onion, garlic, parsley and both breadcrumbs with salt and pepper into a bowl, mix together thoroughly and form into 6 evenly sized patties, I used an egg ring to get even sizing

Dredge both sides of the patties with a little sifted plain flour
Add the cheesy crumb mixture to the melted butter and mix together making sure all crumbs are coated with butter When the wedges have been baking approx 40 mins, increase oven heat to 200 degrees Celsius.
Heat the teaspoon of olive oil in a heavy based fry pan over medium heat and quickly brown both sides of the chicken patties
Remove pan from heat
Place browned patties in the baking dish and layer cheesy crumb mix on top of patties
Return baking tray to oven to bake for a further 10 - 15 mins, or until the chicken is cooked through and the crumbs are golden and crispy. Do not over cook or the patties will be dry.
De-glaze the pan you used to fry the patties with the wine or stock, add the crushed garlic clove and simmer for a few minutes, making sure to scrape up the browning's, strain onto serving plates, top with patties and serve lemon and potatoe wedges on either side of the patties.
Serve with a Green Salad
The lemon wedges go a lovely soft caramelised pulp, and really boosts the flavours of the potatoes and chicken.

Friday, August 7, 2009

A Gordon Ramsay delicious dish

So why would I try another recipe from the net so soon after the zucchini cake? (more on that later, by the way). Just wanted to live dangerously I guess, oh, and I had these veal escalopes and was not fussed on doing the same ol' same ol', and this recipe certainly isn't that, lovely fresh ingredients, fab pic of the finished dish, and Gordon Ramsay isn't exactly known to be a slacker in the kitchen, just had to be a winning combo, and it was.

The original recipe and photo can be found on Lifestyle Food.com.au as 'Veal escalope with Caponata and parsley and lemon linguine'.
For the life of me I cannot get the link to copy/paste.

It's a bit of a 3 step procedure but is simply done, just needs a little time, and as this was only to serve 2 the ingredient amounts have been altered and as usual, I cut the amount of fats used.

I started off with the Lemon Linguine.
Serves 2

130 grams fresh linguine
150 mils chicken stock
2 teaspoons butter, chilled - recipe called for 125grams for 4 servings
grated zest and juice of 1/2 lemon
sea salt and freshly ground black pepper
chopped Parsley............oops, just realised I forgot this.

Cook the linguine in a large saucepan of salted boiling water until just al-dente.

Drain and refresh under cold running water. Drain well and set aside in a covered dish.

Pour the stock into a small saucepan and heat until almost boiling.
Add the lemon zest, then whisk in the butter one teaspoon at a time, whisking vigorously, until the butter is well incorporated. Add lemon juice and season to taste. Put pan to one side until ready to serve.

Next, I crumbed the Veal, this could be done quite a bit before time if you were entertaining.
50grams natural breadcrumbs
25grams finely grated Parmesan
sea salt and freshly ground black pepper
2 veal escalopes
25 grams seasoned plain flour
1 egg, beaten
1 1/2 tablespoons olive oil
basil leaves, shredded or torn
20grams toasted pine nutsGrate the Parmesan cheese, I use a Microplane zester which creates a light and airy pile of cheese that goes a long way.

Beat egg in shallow bowl, place seasoned flour on flat plate and on another plate mix half the breadcrumbs with half the cheese.

The recipe called for 'real' breadcrumbs, that threw me, in this day and age of the bizarre I couldn't stop wondering what unreal breadcrumbs might be..........rainbow coloured? but really, probably some fluffy thing made from a food process waste product, the recipe didn't say fresh so I used toasted crumbs that you buy at a Grocers.

Even weighing out half the breadcrumbs and Parmesan, it still looked to be quite a bit so I mixed them as needed on a plate, and that was a good thing as there was still quite a bit of each left over, perhaps 'British rose Veal escalopes are a lot larger'.
As the escalops were finished I laid them on the lid of a storage container, then covered them using the base as a lid, just love these plastics that come from the 'Cheapie Charlie' stores, some have been used in our house for almost 20years, they stack well in the fridge or in the pantry, the contents are readily seen and they are easily marked with a sharpie pen.

All set to pop into the fridge to rest while the Caponata is assembled. Ingredients needed for the Caponata,now the Darling isn't a fan of Aubergine, nor capers and although he loves olives, generally not in a cooked dish. Am I headed for trouble here?.........well there has to be an adventure in life every now and again and this is it for today.

2 baby aubergine, cut into chunks
1/2 onion, chopped
1 stalk celery, sliced
1/2 red capsicum, chopped
sea salt and ground pepper
2 large tomatoes, deseeded and chopped
1 clove garlic, peeled and minced
1 teaspoon caster sugar
3/4 tablespoon balsamic vinegar
50 grams green olives, pitted and sliced
20 grams capers, rinsed and drained

The recipe also called for quite a bit of olive oil which I found I didn't need/use. This did affect the look of the recipe, there was none of the yellow sauce that you see in the original recipe photo, but did it seriously affect the flavour?, I don't think so and I like to use less oil.


Using a fry pan that is large enough to take the escalopes in a single layer, toast the pine nuts in the dry pan over medium heat, there are enough oils in the pine nuts so that they do not need extra, watch carefully and as soon as browned, remove to a bowl and place to one side until ready to plate the meal.


Place the 1 1/2 tablespoons olive oil in the frying pan and heat over a medium heat until a cube of bread dropped into the oil immediately begins to sizzle and brown.


Lay escalopes into pan and brown well. Turn and brown the other side.
The secret to a nice crisp coating that doesn't pull away is not to disturb the escalopes until the Parmesan has had a chance to melt and become crisp, if you try to turn the escalopes too early the crumb mix will pull away and you will just have a mess.Remove escalopes to paper towel and drain, keep warm in very low oven.

To make the Caponata, increase heat under the pan that you have just used for the escalopes, in the oily pan, saute the aubergine, onion, celery and red capsicum with a little salt and pepper for approx. 3 - 5 minutes.
Add the tomato chunks, with the garlic, sugar, vinegar, olives and capers. Cook quickly for another 5 - 8 minutes, stirring occasionally until the aubergine is tender. Adjust seasoning to taste and keep to one side.

While the aubergine mixture is cooking, place the lemon, stock and butter mixture into a large pan and bring to the boil, lower heat and do not allow to boil away.
When Caponata is almost done, add the linguine to the buttery lemon stock and heat through, approx 1 minute, drain, reserving stock, and using either a fork or tongs, wind pasta onto a warm serving plate to form a nest.
If Caponata has become a little dry, add a tablespoon of the buttery stock that heated the pasta and stir through, spoon Caponata over the pasta, top with a veal escalope. Sprinkle with the toasted pine nuts and either tear or finely shred the basil leaves over the top and serve immediately.
These Basil leaves were very large, from an old plant, so shredding them just resulted in limp un-interesting shreds, and tearing them wasn't much better. This is just not a good time for Basil at the moment.
Oh and that Zucchini and Pineapple Cake, turned out a real treat, everyone loved it. Just goes to show.............don't be too quick to judge the green..

Thursday, August 6, 2009

Zucchini and Pineapple Slice

Decided to try a recipe that I found the other day, a very simple mix and pour cake using, strangely enough, grated zucchini and crushed pineapple.

It was to be a project for the youngest Grandie and I, but we ran out of time because he found that really, he does like shopping, just so long as it's in a kitchen supply store. Buying the cake pan was a done deal in 30 seconds, and the rest of the time?............well, suffice to say, he went home with a little bag full of goodies.

Before we go too much further, I have to say that I was pretty flat about this cake, and the story will unfold as you go along, but the end result is a nicely flavoured, moist cake, and the Darling, who saw it on the kitchen bench, uniced, scoffed a piece and pronounced it yummy, and then he saw the green..............oops, but he still put his hand up for a piece for dessert so it can't be all bad
The full recipe is at the end of the post.
Firstly, put the flour, sugar, coconut, salt and spices into a large mixing bowl, and using your whisk, give them a bit of a stir up to blend, forming a well in the centre.
Grate 300grams zucchini, unpeeled, about 4 medium zucchini, and this is where I started to get a bit concerned, unpeeled zucchini has lots of skin, yep, green flecks all through the pile, I wasn't sure that this was going to turn out well.
Checked the recipe, very definitely unpeeled, there was even a footnote, and the pic of the finished cake looked rather dark, sort of chocolate colour, so I progressed, maybe all that cinnamon would make the cake dark?

In another bowl mix the oil, eggs and vanilla together, - sorry forgot to get a pic of that step, still worrying about the zucchini.....green? in a cake?......

Then pour the oil/egg mixture into the well in the flour, add the grated zucchini, which was looking greener by the minute, and the drained can of crushed pineapple.
Stir to blend, do not over stir. That green is not disappearing!Pour into a lined 9" x 13" (23 cm x 33cm) Pan. As a quilter I'm still way back there in the feet and inches world, but I checked these measurements against my handy dandy ruler.
The mixture ready to go into the oven, lots of green showing here folks.
This is the finished cake, straight from the oven, errk, look at all that green, with closed eyes the kitchen smells delicious and I can't wait for the cake to cool enough to have a little, but really, I don't think the Darling is going to be a happy camper...........what to do....confess before I send him off with it for lunch or just stick lots of cream cheese frosting on it and hope he doesn't notice?

It's pretty hard not to notice green in your cake.
See all those grrr green bits?
But as you see at the beginning of the post, it all turned out o.k. in the end, if you don't look too closely that is...

Recipe: Zucchini and Pineapple Slice
1 1/2 cups self raising flour
1 cup castor sugar
3/4 cup shredded coconut
pinch of salt
2 teaspoons ground cinnamon
freshly grated nutmeg to taste, I used about 1/2 teaspoon
1 teaspoon ground ginger
3 tablespoons Grapeseed or other oil
2 large eggs - (minimum 59gram eggs)
1 teaspoon vanilla extract
1 440 gram can crushed pineapple, drained, reserving some of the syrup for the frosting.
2 cups grated zucchini - well, let me tell you, no more with the unpeeled - next time, definitely peeled!

Cream Cheese Frosting
250 gram softened cream cheese
1 teaspoon butter
1 cup icing sugar
1 1/2 tablespoons reserved pineapple juice

Beat cream cheese and butter until light and fluffy, lower mixer speed and stir in icing sugar, adding a little pineapple juice as needed, when sugar has been incorporated, increase speed and whip until fluffy again.
Spread on top of slice, thickly to hide the green, maybe even sprinkle with a little extra coconut.
I'm a tad disappointed.

Monday, July 20, 2009

Bacon, Mushroom and Pea Pasta

Found this rather interesting recipe on a food blog and decided to make it for dinner. Now I'm not going to link to the blog because, firstly I changed the recipe quite a bit, and more importantly, the blogger stated that if you couldn't use field mushrooms, well just don't use any, certainly not plain 'ole Swiss brown mushrooms. They were rather taken with the fact that along with using field mushrooms, farmers market peas ....oh heck the list goes on.
I would just be too embarrassed to be found out that
a) I changed stuff - onion for shallot, the mushies, added more bacon, sno peas etc. and
b) I used ordinary Swiss brown mushies.
These mushies and other ingredients are from our local fruiterers, who has lovely fresh produce, so go ahead, join me and make this scrummy dish. It's filling, healthy, cost effective and easy. And the Darling thought it was Tasty. - High praise indeed.
These are the ingredients that I used.
A generous cup of thickly sliced mushrooms
half a brown onion, diced
1 large clove garlic, minced
200grams 'fresh' packaged fettuccine
4 rashers bacon, diced
1/2 cup fresh peas, these were a bargain at the fruiterers, I wouldn't hesitate to use frozen.
4 sno peas, sliced cross ways
largish stalk of parsley, finely chopped
Parmesan cheese, finely grated, at least a half cup grated, more if you like a lot of cheese.
olive oil- a generous tablespoon
salt and pepper


Firstly, put a large saucepan of salted water on to boil for the pasta. When water reaches a rolling boil, add the pasta and cook according to package directions. When al-dente - that is cooked but still a little firm to the bite, drain the pasta, reserving a 1/4 cup of the pasta water, for possible use later. Keep pasta warm and covered to one side.

This is how generous my cup of mushrooms was, well just think of all that air in there.

Heat the generous tablespoon olive oil in a heavy based fry pan over medium heat, add the thickly sliced mushrooms, diced bacon and diced onion with the minced garlic, allow to cook for approx 7 Min's until the onion has become translucent and the bacon and mushrooms are browning slightly. Stir occasionally. Season with a little salt and pepper. Add the fresh podded peas, if using frozen peas, wait a couple more minutes until mushroom, bacon mix is almost done. Stir peas through and allow to cook for 1 - 2 minutes, or if frozen until just starting to heat through. Next add the parsley and then the sliced sno peas, stir through mushroom bacon mixture. Time to add some of the pasta, stir it through the bacon mixture and then add the remainder of the pasta, I didn't add the entire 200 grams of cooked pasta, more like 180grams. The Darling is more a 'sauce' than a 'pasta' fan, use the amount that suits you, love your pasta? then put it all in, if the sauce is a little dry, add a little of the reserved pasta water, just a teaspoon or so will be all that you need. Stir the pasta through the sauce thoroughly, coating the pasta well with the oil and flavour packed juices of the bacon and vegetables. Toss the pasta into a bowl and put a nice big nest of grated Parmesan on top. Serve immediately with extra grated Parmesan.

Chicken and Sweet Corn Soup.....

..... the only thing better when you are feeling low may be chicken noodle soup, although I have heard of that fall back of all Jewish Mums, Jewish Penicillin, or Chicken Soup that will take a few hours to achieve. Well sometimes you don't have hours, when someone you love says 'I's sick, I got da flu', you immediately think 'Chicken Soup', and so that was the case this afternoon, the youngest is down, not well, got the flu, so Chicken and Sweetcorn was a must.

This is the line up of the vital ingredients, Sweet Corn, of course, some kind of bony chicken, being the end of the day, the butcher only had wings so that is what we are using here, an onion, well half is all that was needed and a small clove of garlic, and lets not forget the salt and pepper.

Oh yeah, and the oil, pour about half a tablespoon into a heavy based fry pan and heat over medium heat.
Oh and yeah, don't forget the carrot, use half a carrot, peel and cut in half length ways, place in pan and allow to start browning

then add the half onion, roughly chopped into fairly largish pieces, here I cut it into wedges, and the clove of garlic, peeled and cut in half. Lastly add the chicken wings.
The idea is to give everything only a little browning, not too much, just enough to bring out the flavours and to add a hint of colour.
Lift everything into a saucepan and de-glaze the fry pan with about 1/2 cup water, stirring around to lift any brown bits off the bottom of the pan.
Pour into the saucepan with the chicken and vegetables. Add enough water to cover the chicken. Stock would be better than water but this was an emergency and stock was not in the freezer.
Add salt and pepper, cover and bring to a boil, lower the heat and simmer for about half an hour.
Meanwhile, cut the kernels from 2 cobs of corn, these were large cobs and I only used the kernels from 1 1/2 cobs. Don't forget to scrape the juicy bits of the kernels from the cob using the back of a knife.
After the chicken etc has simmered away for 30 - 45 minutes, strain into a large bowl, reserving chicken and stock.
Wash the saucepan and return the strained stock to the pan, check the seasoning, add the corn kernels and return to a simmer, simmer for approx 10 Min's, or until corn is cooked.
Remove the pan from the heat and then blend the corn and stock together, here I used a stick mixer but a blender or food processor would work just fine.
Return the pan to the heat and bring just to the boil, bubbles will start to emerge at the sides of the pan.
While waiting for corn and stock to come to the boil, mix 2 teaspoons cornflour with a scant 1/4 cup water, when bubbles appear, use a whisk to stir corn and stock briskly and gently pour cornflour into corn mixture.
Stir until mixture returns to boil, turn heat down and allow to gently simmer for a few minutes, stirring occasionally.
Meanwhile, strip the chicken from the bones at the fleshy end of the wings, and if you have pets as we do, you might as well strip all the rest of the flesh and skin from the wings, keep the yummy plump bits for the soup and pop the other into a separate pile, this will be doggie dinners for the evening and greatly appreciated doggie dinners at that.

Now just squish those plump pieces of chicken - yep I used my fingers - you don't want great lumps in your soup.
Add squished chicken to corn mixture and Viola!!
Chicken Sweet Corn Soup! - Just go ahead and pour it into a bowl, maybe even sprinkle a few slivers of green onion on top and serve with some nice bread or even garlic toasts.
And I'm sure you will feel much better. This also freezes well for a couple of months, great to have in the freezer for those winter chills or even when you just can't seem to manage to find the energy to face the kitchen.
What I used for 2 servings
4 chicken wings
1/2 medium sized onion
1 small clove garlic
1/2 medium carrot
approx 1 tablespoon oil - I used olive oil
corn kernels from 2 small or 1 1/2 larger corn cobs
2 teaspoons cornflour
1/4 cup water
approx 1 1/2 - 2 liters water extra.
Salt and Pepper